Dealing with “organize your Gmail inbox” can feel overwhelming. Every new ping, unread mail, and unsorted label adds another layer of distraction, making it harder to focus on the truly important tasks. Organizing your Gmail inbox is crucial for reducing mental clutter and boosting productivity. Whether you’re a freelancer, corporate professional, or student, a tidy inbox allows you to focus more on what matters most.
In this guide, we’ll explore simple steps to organize your Gmail inbox so that you can boost your focus. A few minutes of setup can help you streamline your email process and take full control over your digital workspace.
Why we Organize Your Gmail Inbox
Before diving into the steps, it’s essential to understand the benefits of an organized inbox:
- Increased Productivity: With emails clearly categorized, you can quickly find and respond to messages.
- Reduced Stress: A clutter-free inbox reduces the mental burden of unanswered or forgotten emails.
- Better Time Management: You no longer need to search through endless emails to find what’s important.
- Improved Communication: Prioritizing responses helps you stay professional and responsive.
Gmail offers various built-in features to help you manage your inbox more effectively. Let’s take a closer look at how to make the most of them. We’ll explore simple steps to organize your Gmail inbox so that you can boost your focus.
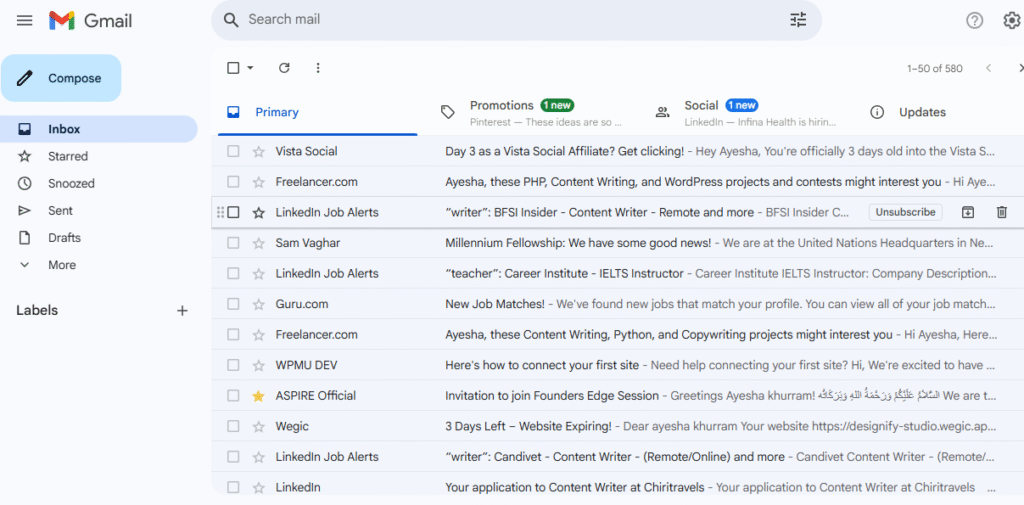
Step 1: Use Gmail’s Categories Feature
Gmail automatically sorts incoming emails into categories like “Primary,” “Social,” “Promotions,” “Updates,” and “Forums.” To modify or enable these categories:
- Click on the gear icon in the top-right corner and select “Settings.”
- Choose “See All Settings.”
- Go to the “Inbox” tab.
- In the “Categories” section, check the boxes next to the tabs you want to enable.
- Click “Save Changes.”
These categories automatically organize incoming emails, allowing you to focus on what’s most important while leaving less urgent emails (like promotions) to be dealt with later. We’ll explore simple steps to organize your Gmail inbox so that you can boost your focus.
Step 2: Archive Instead of Deleting Emails
While deleting emails may seem like a quick fix to declutter your inbox, it’s permanent. Instead, consider archiving emails. Archiving removes them from your inbox but still keeps them accessible via search.
To archive emails:
- Select the emails you want to archive.
- Click the “Archive” button (a box with a downward arrow) in the top menu.
Archived emails will not clutter your inbox but can still be retrieved from the “All Mail” folder or by using Gmail’s search function. We’ll explore simple steps to organize your Gmail inbox so that you can boost your focus.
Step 3: Create and Use Labels
Labels in Gmail act like folders, but with more flexibility. You can apply multiple labels to a single email, making it easier to categorize your messages based on projects, clients, or topics.
To create a label:
- On the left-hand sidebar, click “More” > “Create New Label.”
- Name your label (e.g., “Invoices,” “Clients,” or “Team Updates”).
- Click “Create.”
Labels can be applied manually or automatically through filters, which we’ll discuss next. We’ll explore simple steps to organize your Gmail inbox so that you can boost your focus.
Step 4: Set Up Filters to Organize Automatically
Filters allow you to automatically sort your emails, saving you time and effort. Here’s how to create a filter:
- Click the sliders icon in the search bar to open advanced search options.
- Enter the criteria, such as the sender, subject, or keywords.
- Click “Create Filter.”
- Choose actions like labeling, marking as read, or skipping the inbox.
- Click “Create Filter” again.
For example, you could create a filter to label all emails from your accounting software as “Invoices.” We’ll explore simple steps to organize your Gmail inbox so that you can boost your focus.
Step 5: Mark Important Emails with Stars
Gmail allows you to mark emails as important with colored stars. This helps you prioritize follow-ups or critical tasks.
To customize your stars:
- Go to Settings > General.
- Scroll to the “Stars” section and drag the additional stars you want to use into the “In use” area.
- Click “Save Changes.”
These stars help you visually distinguish between different levels of priority. We’ll explore simple steps to organize your Gmail inbox so that you can boost your focus.
Step 6: Use the Snooze Feature
The Snooze feature is perfect for emails you don’t need to address immediately. It lets you temporarily remove an email from your inbox and have it reappear at a later time.
To snooze an email:
- Hover over the email you want to snooze.
- Click the clock icon in the top-right corner.
- Choose a date and time that works for you.
The email will disappear from your inbox and reappear when you’re ready to handle it, allowing you to focus on more urgent matters. We’ll explore simple steps to organize your Gmail inbox so that you can boost your focus.
Step 7: Unsubscribe and Delete Unwanted Emails
If your inbox is full of newsletters or promotional emails you no longer care about, it’s time to unsubscribe. Unsubscribing reduces clutter and helps you focus on more relevant messages.
To unsubscribe:
- Open the email and click the “Unsubscribe” link (usually near the sender’s address).
- Alternatively, use tools like Unroll.me to unsubscribe from multiple emails at once.
Fewer unwanted emails mean less disruption throughout your day. We’ll explore simple steps to organize your Gmail inbox so that you can boost your focus.
Step 8: Use Search Operators to Find and Organize Email
Gmail’s powerful search tools allow you to quickly find and organize past emails. Some useful search operators include:
- from: to search by sender (e.g., “from:jane@company.com”).
- subject: to search by subject (e.g., “subject:invoice”).
- older_than: to find emails older than a certain period (e.g., “older_than:6m”).
- has:attachment to filter emails with attachments.
These operators help you quickly sort through your emails. We’ll explore simple steps to organize your Gmail inbox so that you can boost your focus.
Step 9: Enable Gmail’s Smart Features
Gmail’s smart features, powered by artificial intelligence, can help you work more efficiently. To enable them:
- Go to Settings > General.
- Scroll down to the “Smart Compose,” “Smart Reply,” and “Nudges” sections.
- Ensure all three are turned on to receive automatic responses, reminders, and suggestions.
These features help reduce the volume of emails and save you time. We’ll explore simple steps to organize your Gmail inbox so that you can boost your focus.
Step 10: Use Bulk Actions to Declutter
When your inbox is overflowing, bulk actions can be a lifesaver. You can select multiple emails and apply actions like archiving, deleting, or labeling.
To use bulk actions:
- Select a label or use the search function to filter emails.
- Click the “Select All” checkbox.
- Use the top menu options to archive, delete, or label the emails.
Just a few clicks can help you organize hundreds of emails.
Step 11: Try Priority Inbox
Priority Inbox automatically sorts emails based on importance, helping you focus on what matters most. We’ll explore simple steps to organize your Gmail inbox so that you can boost your focus.
To enable Priority Inbox:
- Go to Settings > Inbox.
- Under “Inbox Type,” select “Priority Inbox.”
- Customize sections like “Important and unread,” “Starred,” and others.
- Click “Save Changes.”
This view ensures that important emails stay at the top of your inbox.
Step 12: Use Third-Party Tools
To enhance your Gmail experience, consider using third-party tools that help with email management:
- Clean Email: Automatically clean your inbox.
- Sortd: Turn your inbox into a to-do list.
- Mailstrom: Delete massive batches of emails based on sender, subject, or time.
These tools streamline your email workflow, making it more efficient.
Step 13: Establish a Daily Email Routine
A tidy inbox requires discipline. Here’s a daily routine you can follow:
- Spend 10 minutes in the morning checking and replying to urgent emails.
- Spend 10 minutes in the afternoon organizing emails using labels and filters.
- Spend 5 minutes in the evening archiving or snoozing emails for later.
Designating specific times for email tasks helps you avoid constantly reacting to incoming messages. We’ll explore simple steps to organize your Gmail inbox so that you can boost your focus.
Step 14: Turn Off Non-Essential Notifications
Constant notifications can be distracting. To reduce interruptions:
- Go to Settings > See All Settings.
- Under “Desktop Notifications,” choose “Important mail notifications on” or “Mail notifications off.”
- Click “Save Changes.”
On mobile, you can also customize notification settings for the Gmail app.
Step 15: Review and Update Weekly
Spend 15 minutes each week reviewing and updating your inbox:
- Eliminate or merge irrelevant labels.
- Update filters for new types of emails.
- Archive or delete old threads that are no longer needed.
- Optimize your workflow for better efficiency.
This ensures your inbox remains clean and manageable over time. We’ll explore simple steps to organize your Gmail inbox so that you can boost your focus.
Final Thoughts: A Clutter-Free Inbox Equals a Clear Mind
A tidy Gmail inbox doesn’t have to be a source of stress. These simple steps can help you turn your inbox into a streamlined communication tool that supports your focus and productivity. From creating filters and labels to leveraging smart features and establishing routines, every action you take brings you closer to a more organized and productive digital workspace.
Please consider logging into your Gmail account today to begin organizing your inbox. The results will speak for themselves: fewer distractions, higher productivity, and a greater sense of control over your daily routine.
Want to know about ” How to Use Google Trends to Find Popular Keyword Ideas for Your Blog“